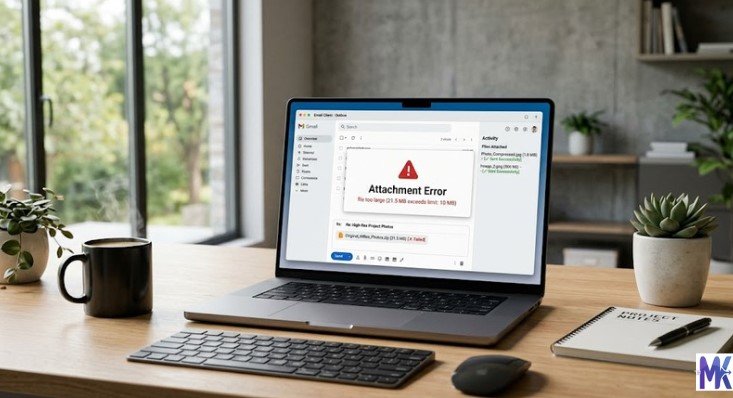
You built a great website. The design looks clean. The content is solid. But visitors are leaving within seconds and you cannot figure out why.
Nine times out of ten, the answer is speed. And the biggest reason websites are slow is uncompressed images.
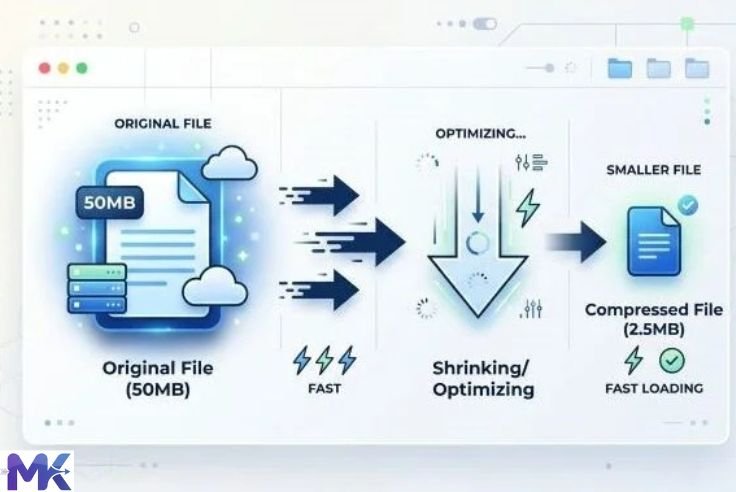
Most people upload photos straight from their phone or camera without thinking twice. A single photo from a modern smartphone can be 4MB to 8MB. Put ten of those on one page and your website is carrying 60MB of images that every visitor has to download just to see your content.
That is a problem ! and it is one of the easiest problems to fix.

Compressing images for web is not just a technical best practice reserved for developers. It is something every website owner, blogger, photographer, and small business needs to understand and do consistently.
This guide explains exactly why image compression matters for websites, what happens when you skip it, and how to do it quickly and for free.
What Happens When You Do Not Compress Images for Web
Let us start with the real consequences because understanding the problem makes the solution feel worth doing.
Your Website Loads Slowly
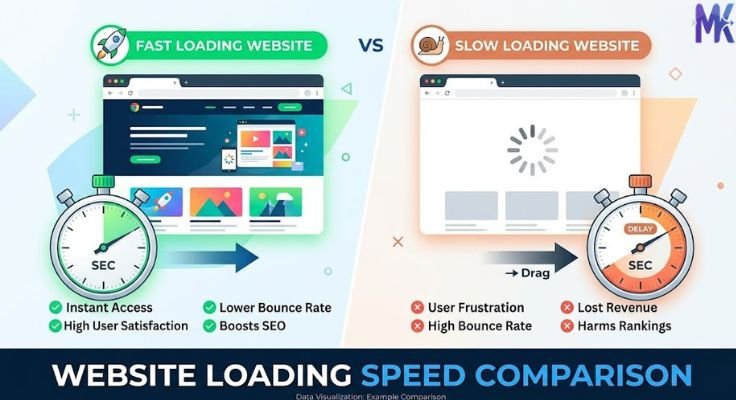
This is the most immediate effect. Large image files take time to download. Every visitor who opens your page has to wait for those files to transfer from your server to their device.
On a fast broadband connection, a heavy page might load in 5 to 8 seconds. On a mobile data connection which is how more than 60% of web traffic arrives it can take 15 to 20 seconds or more.
Most visitors will not wait that long. They close the tab and move on.
You Lose Visitors Instantly
Research consistently shows that most users expect a website to load in under 3 seconds. Every additional second of load time increases the chance they leave before the page even finishes loading.
If your images are not compressed, you are losing visitors before they even see your content, your products, or your message. That is a real cost whether you measure it in lost sales, lost readers, or lost leads.
Your Search Rankings Drop
Google cares about page speed. It has been an official ranking factor since 2010 for desktop searches and since 2018 for mobile searches.
When Google’s crawlers visit your website, they measure how fast it loads. Slow pages get lower rankings. Lower rankings mean less organic traffic. Less traffic means fewer people finding you.
Compressing your images is one of the highest-impact things you can do for SEO and it costs nothing.
You Pay More for Hosting
Most web hosting plans charge based on bandwidth the amount of data transferred between your server and your visitors. Large uncompressed images consume bandwidth at a much faster rate than compressed ones.
If you are on a shared hosting plan or a plan with bandwidth limits, uncompressed images can push you over your limit, triggering extra charges or throttled speeds.
Mobile Users Get a Terrible Experience
Mobile devices have smaller screens which means they cannot even display the extra resolution in your uncompressed images. They are downloading 5MB of image data to display it at 400 pixels wide. All that extra data is pure waste.
At the same time, mobile data connections are slower and often metered. Visitors on mobile data are using their personal data allowance to load your heavy images. That is bad for their experience and bad for your reputation.
The Numbers That Show Why This Matters
Let us make this concrete with some real numbers.
A typical blog post might have 8 images. If each image is an uncompressed photo from a phone camera, each one might be around 4MB. That is 32MB of image data per page.
Compress those same images to 150KB each and the total drops to 1.2MB a 96% reduction.
At an average mobile connection speed of 20 Mbps, here is the difference in loading time for just the images:
- Uncompressed (32MB): approximately 13 seconds
- Compressed (1.2MB): approximately 0.5 seconds
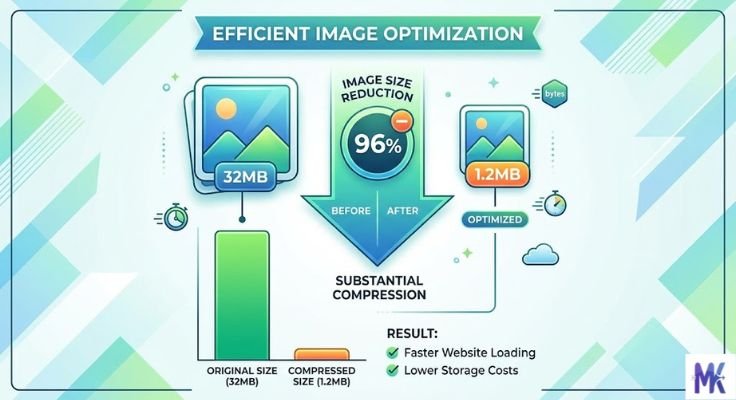
That difference more than 12 seconds is the difference between a visitor staying and a visitor leaving.
Now multiply that across every page of your website and every visitor who comes to it. The impact of image compression is enormous.
Why Compressing Images for Web Works Without Ruining Quality
The most common objection people have is: “I do not want my images to look bad.”
This is a reasonable concern but it is based on a misunderstanding of how compression works.
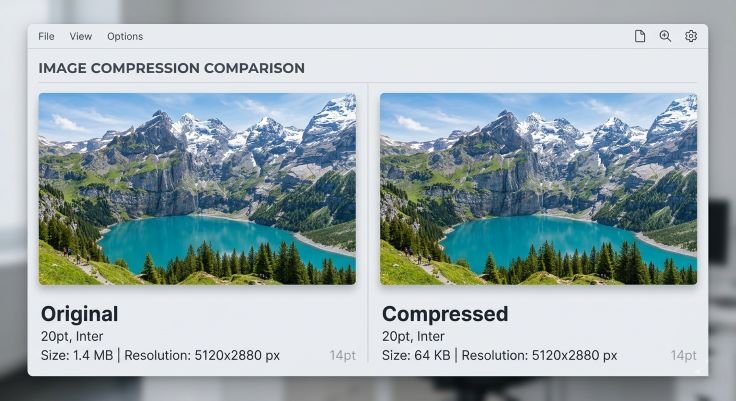
When a professional compression tool reduces an image from 4MB to 150KB, it is not randomly throwing away pixels. It is removing data that human eyes are not sensitive to tiny color variations in smooth areas, redundant data in uniform regions, pixel-level details that are invisible at normal screen sizes.
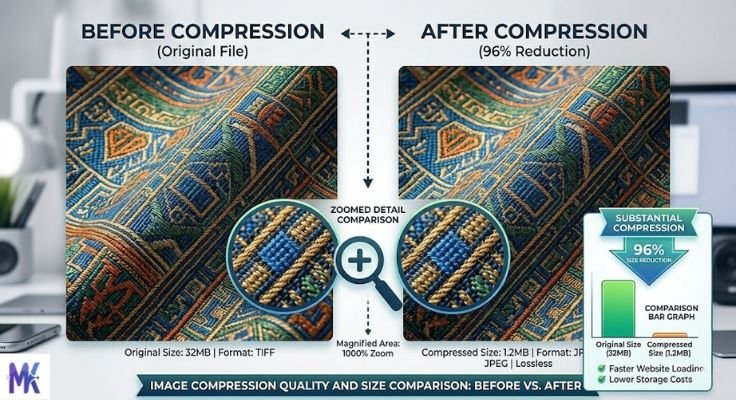
The result is an image that looks identical on a screen to the original. You would have to zoom in to 300% or 400% and compare them side by side to notice any difference and even then, the difference is often barely perceptible.
This is especially true for photographs displayed on websites. Screens display images at 72 to 96 pixels per inch. Photos taken on modern cameras contain far more data than that. All of that extra data compresses away invisibly.
How Image Compression Improves SEO
Search engine optimization and image compression are directly connected in several important ways.
Page Speed Score
Google measures your page speed using tools like PageSpeed Insights and Core Web Vitals. Uncompressed images are the number one reason pages fail these tests.
When your images are compressed, your page speed score improves. A better score signals to Google that your page provides a good user experience. That leads to higher rankings.

Core Web Vitals
Google now uses Core Web Vitals as a ranking signal. These are three specific measurements:
Largest Contentful Paint (LCP) — how long it takes for the main content of a page to appear. For most web pages, the largest element is an image. Compressing that image directly improves your LCP score.
Cumulative Layout Shift (CLS) — how much the page layout shifts while loading. Large images that load slowly cause content to jump around. Compressed images that load quickly reduce layout shift.
Interaction to Next Paint (INP) — how responsive the page feels. Faster loading pages feel more responsive.
All three of these metrics improve when your images are compressed.
Crawl Budget
Google’s bots spend a limited amount of time crawling each website. If your pages are slow to load because of heavy images, fewer pages get crawled in each visit. Faster pages with compressed images allow Google to crawl more content, which means more of your pages get indexed.
How Image Compression Affects User Experience
Speed is the foundation of user experience on the web. Everything else design, content, layout only matters if the page actually loads fast enough for people to see it.
First Impressions
A slow website creates an immediate negative impression. Visitors assume the website is poorly maintained or untrustworthy. A fast website creates confidence.
Mobile Experience
With most web browsing now happening on phones, mobile experience is not optional. Compressed images load fast on mobile data connections. Uncompressed images do not. If your website loads slowly on a phone, you are losing the majority of your potential audience.
Bounce Rate
Bounce rate is the percentage of visitors who leave after viewing only one page. High bounce rates signal to Google that your content is not satisfying visitors and your rankings drop as a result.
Page speed is one of the strongest predictors of bounce rate. Slow pages have high bounce rates. Fast pages have low bounce rates. Compressed images make pages fast.
Conversion Rate
If you run an e-commerce store or any website where you want visitors to take an action buy something, sign up, contact you page speed directly affects whether they do it.
Studies across e-commerce have repeatedly shown that every one-second improvement in load time increases conversion rates meaningfully. Compressing your product images is one of the most direct ways to improve load time.
Which Images on Your Website Need Compression?
The short answer is: all of them. But let us be specific about the different types of images on a typical website.
Hero Images and Banners
These are the large images at the top of pages. They are often the heaviest files on the page and also the most important for first impressions.
A hero image should ideally be under 200KB. Most uncompressed hero images are 3MB to 8MB. Compressing them has an enormous impact on load time.
Blog Post Images
Blog posts often contain 5 to 15 images. Each one needs to be compressed. A target of 100KB to 150KB per image is a good standard for most blog content.
Product Images
E-commerce product images need to look great but they also need to load fast. Most product images can be compressed to 100KB to 200KB without any visible quality change at the sizes they are displayed on screen.
Background Images
Background images load before anything else on a page. A heavy background image delays everything. Compress background images aggressively often down to 50KB to 100KB is achievable without visible difference.
Thumbnails and Icons
Small images like thumbnails, profile pictures, and icons should be very small often under 30KB. There is no reason for a 100×100 pixel thumbnail to be 500KB.
Logo
Your logo loads on every page of your website. It should be as small as possible often under 20KB is achievable for a well-optimized logo without any visible change.
How to Compress Images for Web the Right Way
There is a right way and a wrong way to compress images for web. The wrong way is over-compressing making files so small that quality visibly suffers. The right way is finding the balance where files are small but images still look sharp.
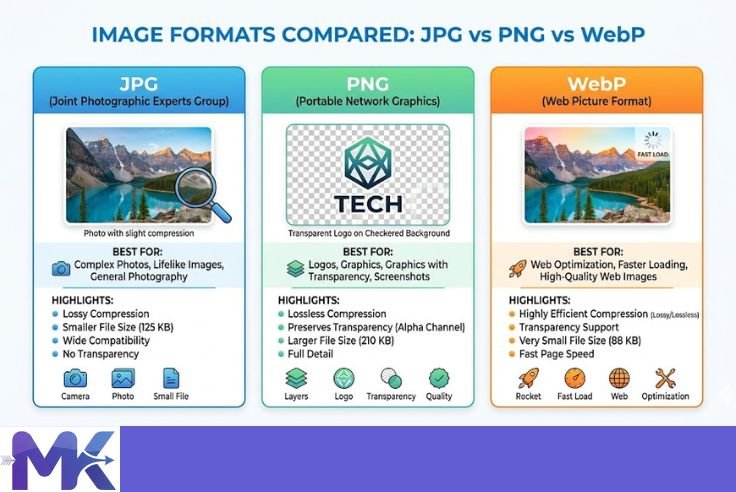
Step 1 — Choose the Right Format
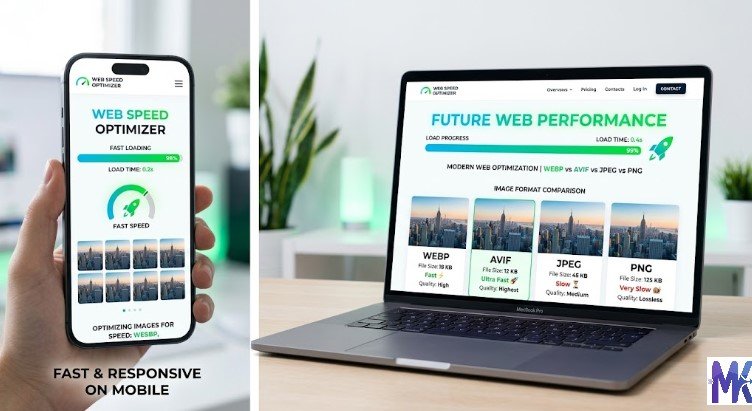
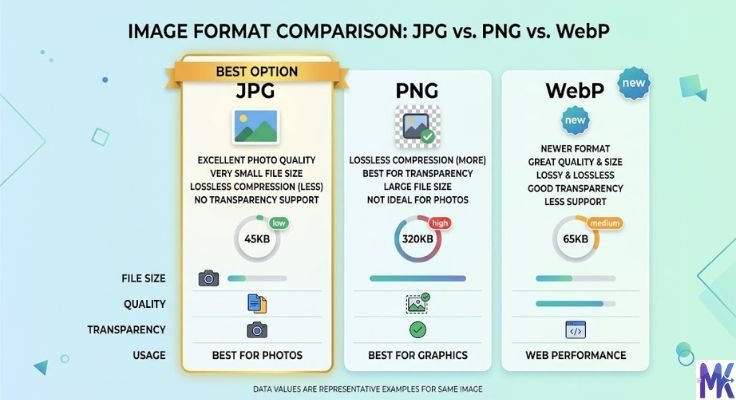
JPG for photographs and images with complex colors. It compresses efficiently and is supported universally.
PNG for logos, icons, screenshots, and images with transparent backgrounds. Use lossless compression.
WebP for everything, if your platform supports it. It produces smaller files than both JPG and PNG at equal quality. Modern browsers all support WebP. If you can use WebP, you should.
Step 2 — Resize Before Compressing
Do not upload a 4000-pixel-wide image if it will only be displayed at 800 pixels wide. Resize the image to the display size first. This removes pixels that were never going to be seen which is true lossless size reduction.
Step 3 — Set a Target Size
For web use, a good general target is:
- Full-width hero images: 150KB to 250KB
- Blog post content images: 80KB to 150KB
- Product images: 100KB to 200KB
- Thumbnails: 20KB to 50KB
- Background images: 50KB to 100KB
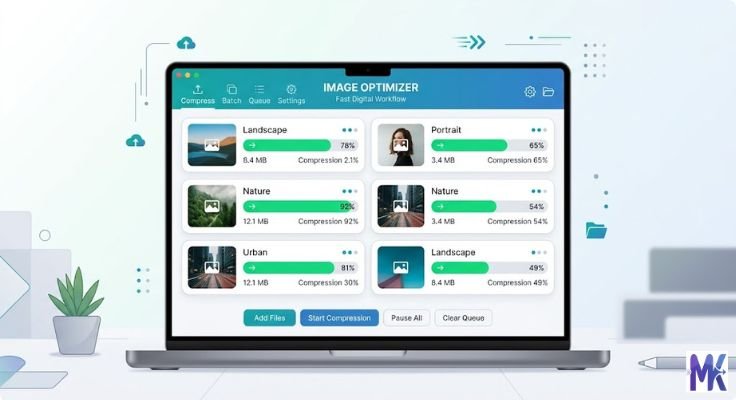
Step 4 — Use a Compression Tool
Go to mbtokb.site. Upload your images you can upload multiple at once and compress them all in one go. Enter your target size or choose from the fixed size options (50KB, 100KB, 150KB, 200KB, and more). Click compress and download.

Everything runs in your browser. Your images are never uploaded to a server or stored anywhere. Fast, private, and free.
If you are preparing images for a website with many pages, like a blog or an e-commerce store, the bulk upload feature is especially useful. Select all your images at once, compress them together, and download them all at once or individually. What would take an hour one-by-one takes just a few minutes in bulk.
Step 5 — Check Before Publishing
Open the compressed image at the size it will be displayed on your website. Does it look sharp? Are colors accurate? Are edges clean?
If yes ,publish it.
If it looks soft, go back and compress to a slightly higher size. The difference between 100KB and 150KB is often invisible, and the extra 50KB preserves noticeably more detail.
How Much Difference Does Image Compression Actually Make?
Here is a realistic before-and-after comparison for a typical website scenario.
Before compression:
- 10 page images × 4MB each = 40MB total
- Page load time on average mobile connection: 16 seconds
- Google PageSpeed score: 32 out of 100
- Expected bounce rate: very high
After compression:
- 10 page images × 120KB each = 1.2MB total
- Page load time on average mobile connection: under 1 second
- Google PageSpeed score: 85+ out of 100
- Expected bounce rate: significantly lower
Same images. Same website. Same content. Just compressed and the entire performance profile changes.
Common Mistakes When Compressing Images for Web
Compressing after uploading Always compress images before uploading them to your website. Some website builders compress images automatically when you upload but they often do a poor job. Compress first, then upload.
Using PNG for all images PNG is lossless and preserves quality perfectly but it produces much larger files than JPG for photographs. Use PNG only for graphics, logos, and images needing transparency.
Ignoring image dimensions Uploading a 5000-pixel-wide image and letting the website scale it down in the browser is wasteful. The browser still downloads the full 5000-pixel file. Resize to the right dimensions before compressing.
Compressing only some images One uncompressed 8MB hero image can undo all the gains from compressing every other image on the page. Every image needs to be compressed consistently.
Re-compressing already compressed images Every time a JPG is compressed and saved again, it loses a little more data. Always work from the original file and compress a copy. Never compress a compressed image.
Frequently Asked Questions
Yes. mbtokb.site supports bulk uploads. Select all your images at once, set your target size, and compress everything together. Each image downloads individually when done.
For most web images, target 100KB to 200KB. For thumbnails and icons, target under 50KB. For full-width hero images, stay under 250KB. These sizes load fast and look sharp on any screen.
Moderate compression — the kind needed for most web images — is invisible at normal screen viewing sizes. Only extreme compression causes visible quality loss. The right target size for web images preserves all the quality that matters.
WebP is the best format for web use — smaller files than JPG and PNG at equal quality. If your platform does not support WebP, use JPG for photos and PNG for graphics.
On mbtokb.site, all processing happens in your browser. Nothing is sent to a server. Your images never leave your device. It is completely private.
Yes — indirectly but meaningfully. Compressed images improve page speed. Page speed is a Google ranking factor. Faster pages rank higher and have lower bounce rates, which further improves rankings over time.
Conclusion
Compressing images for web is not a technical task reserved for developers. It is a fundamental habit that every website owner needs to build because the impact on speed, user experience, and search rankings is direct and significant.
Uncompressed images make websites slow. Slow websites lose visitors. Lost visitors mean lost revenue, lost readers, and lost opportunities.
The fix is simple. Before you upload any image to your website, compress it first. Use the right format. Hit a reasonable target size. And if you have many images to process, compress them all at once.
mbtokb.site makes this easy and free. Upload multiple images in one go, choose your target size whether that is 100KB, 150KB, or a custom size and download compressed files ready to publish. Everything runs in your browser. Nothing is stored. No sign-up needed.
Fast websites start with compressed images. Start compressing yours today.