Introduction to Government Image Requirements
Why Image Size Matters in Indian Online Forms
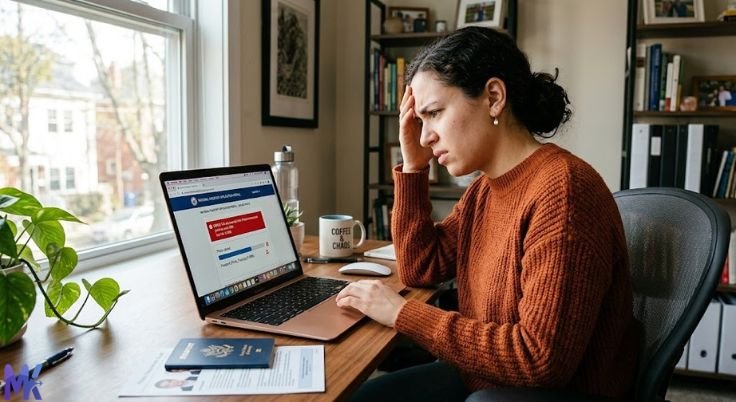
When you apply for a government service online in India whether it’s a passport, Aadhaar update, or competitive exam registration uploading the correct image is one of the most critical steps. Government portals are built with strict technical specifications, and even a slightly oversized photo or incorrectly formatted signature can result in form rejection, application delays, or disqualification.

Image size matters for several reasons. First, government servers have limited bandwidth and storage, so they enforce file size caps to manage load efficiently. Second, standardized dimensions ensure that printed documents, ID cards, and admit cards look uniform across millions of applicants. Third, certain document verification systems use pixel dimensions to authenticate photos automatically a wrong size can cause the system to flag your application as invalid without any human review.
In 2026, as more government services move entirely online through portals like DigiLocker, Umang, and department-specific websites, getting your image specifications right the first time can save you hours of frustration.
Common Problems Users Face During Upload
The most frequently reported problems during government form image uploads include the following. The “File Size Too Large” error appears when your photo or signature exceeds the portal’s maximum KB or MB limit. The “Invalid Format” error shows up when you upload a PNG on a portal that only accepts JPG, or vice versa. “Incorrect Dimensions” errors occur when the pixel width and height don’t match the exact requirements. “Blurry or Low Quality” rejections happen when compression is too aggressive or the original photo is poor. Session timeouts are another common issue users spend too long resizing images and the form session expires, requiring them to start over.

Many users also face confusion because different portals even within the same government have different rules. UPSC, SSC, and IBPS all have different KB limits and pixel dimensions, which creates genuine confusion for applicants appearing in multiple exams.
Standard Image Size Rules Across Indian Government Portals
File Size Limits (KB/MB)
Most Indian government portals enforce a file size limit between 10 KB and 300 KB for photographs, and between 5 KB and 80 KB for signatures. Here is a general breakdown of the most common size ranges you will encounter.
For photographs, the most common maximum limit is 50 KB to 100 KB. Some portals like UPSC allow up to 300 KB, while older portals may restrict photos to as little as 20 KB. For signatures, limits typically range from 10 KB to 50 KB. Document scans such as certificates and marksheets usually allow larger files, ranging from 100 KB to 2 MB depending on the portal.
As a general rule, aim to keep your passport-sized photo under 50 KB and your signature under 30 KB, and you will be within the acceptable range for the majority of Indian government portals.
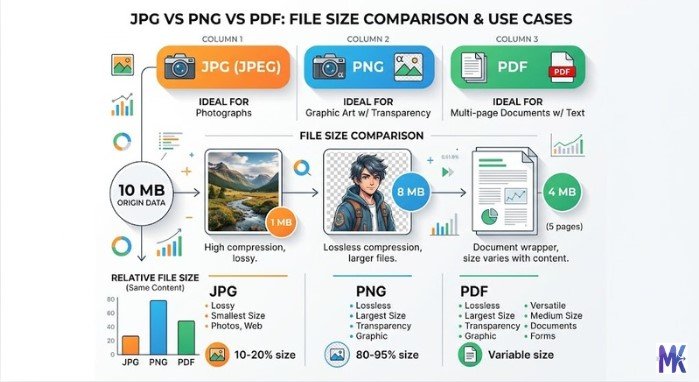
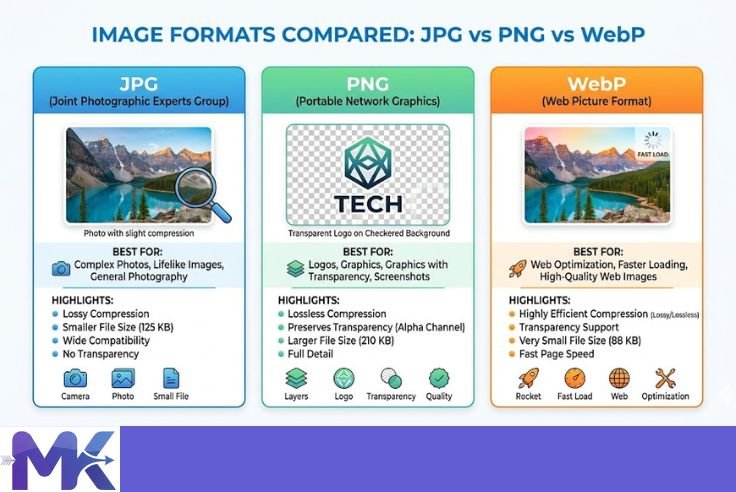
Accepted Formats (JPG, JPEG, PNG)
JPG and JPEG are the most universally accepted formats across Indian government websites. Almost every portal from passport applications to exam registrations accepts JPG or JPEG files. The difference between JPG and JPEG is only the file extension name; they are technically the same format.
PNG is accepted on several portals, particularly those that require transparent backgrounds or higher-quality signatures. However, PNG files are generally larger in size, so using PNG can sometimes cause you to exceed file size limits even when the image looks correct.
PDF format is accepted for document uploads such as certificates, marksheets, and identity proofs on portals like DigiLocker, UIDAI, and various state government services. BMP and TIFF formats are almost never accepted on Indian government portals and should be avoided entirely.
When in doubt, always convert your image to JPG before uploading to any Indian government website.
Photo & Signature Size Guidelines
The standard passport-sized photograph in India measures 35mm x 45mm, which corresponds approximately to 1.38 x 1.77 inches. In pixels, at 100 DPI this is roughly 138 x 177 pixels, while at 200 DPI it becomes 276 x 354 pixels. Most portals specify both the physical size and the pixel dimensions, so always check both.
For signatures, the typical requirement is a white background with a black or blue ink signature. The captured image should be sized between 140 x 60 pixels and 800 x 300 pixels depending on the portal. Signatures are almost always required in JPG format and must be under 30 KB in most cases.
Dimension Requirements (Pixels & DPI)
DPI stands for Dots Per Inch and determines the resolution and print quality of an image. Indian government portals typically require images at 100 DPI to 200 DPI for online applications, while printed photographs for physical submission may require 300 DPI or higher.
Common pixel dimension requirements for photographs on Indian portals are 100 x 120 pixels (minimum for many portals), 200 x 230 pixels (standard for most exam portals), 350 x 350 pixels (for square-format passport photos), and 413 x 531 pixels (used for some MEA and passport-related forms).
For documents, the scan resolution should ideally be 150 DPI to 300 DPI to ensure text is legible after upload.
Department-Wise Image Size Requirements (India)
Passport Seva (Ministry of External Affairs)
The Passport Seva Portal managed by the Ministry of External Affairs follows specific photo guidelines aligned with ICAO international standards. The photograph must be a recent color photo with a white background, printed on high-quality glossy paper or submitted digitally in JPG format.
Photo size must be 2 x 2 inches (51 x 51 mm) with the face occupying 70 to 80 percent of the frame. The digital photo file must be in JPG format with a minimum size of 10 KB and a maximum of 1 MB. The pixel dimensions should be at least 200 x 200 pixels. The image must be in color, not black and white, and must not have any shadows on the face or background.
For the online application form, the photo is typically uploaded on the portal during form filling, and the same photo is used for the physical appointment at the Passport Seva Kendra.
Aadhaar (UIDAI)
The UIDAI portal allows Aadhaar updates including name, address, date of birth, and photograph. For photograph updates, the resident must visit an Aadhaar Enrolment Centre in person, where the photo is captured live using a biometric device. Online photo uploads are not permitted directly for Aadhaar due to biometric security requirements.
However, when uploading supporting documents for Aadhaar corrections online, the accepted format is JPG or PDF, with a maximum file size of 2 MB per document. The document must be clearly scanned and legible.
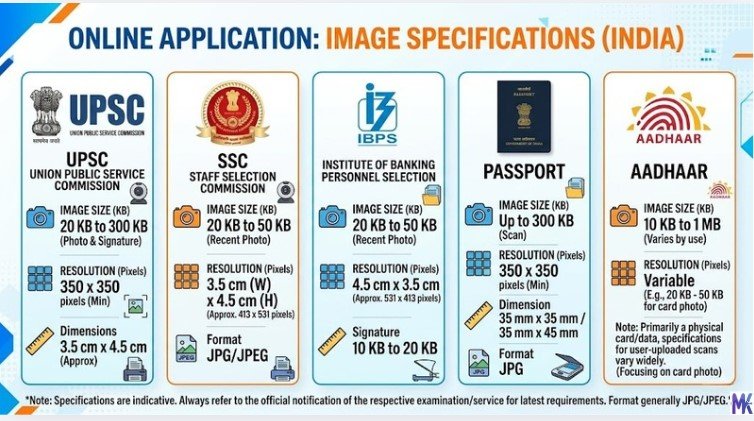
UPSC Online Applications
The Union Public Service Commission has one of the more generous image size policies among Indian exam bodies. For the Civil Services Examination and other UPSC exams, the photograph must be in JPG format with a minimum size of 3 KB and a maximum of 300 KB. The recommended dimensions are 200 x 230 pixels. The background should be white or light-colored, and the photo must be recent (taken within the last six months).
The signature must also be in JPG format, between 1 KB and 30 KB, with dimensions of approximately 140 x 60 pixels. Both the photo and signature must be scanned or captured clearly without any smudging or background noise.
SSC Exams (CGL, CHSL, etc.)
The Staff Selection Commission requires a color photograph with a white background in JPG format. The file size for the photo must be between 20 KB and 50 KB. The dimensions recommended are 100 x 120 pixels. The signature must be in JPG format with a file size between 10 KB and 20 KB, at dimensions of 140 x 60 pixels.
For SSC exams, the photo must not be more than three months old, and the candidate’s name and date of photograph must be written on a white strip at the bottom of the photo when submitting physical copies, though this is not required for digital uploads.
Banking Exams (IBPS, SBI, RBI)
IBPS (Institute of Banking Personnel Selection) requires photos and signatures in JPG format. The photograph must be between 20 KB and 50 KB, and the dimensions should be 200 x 230 pixels. The signature must be between 10 KB and 20 KB, with dimensions of 140 x 60 pixels.
SBI (State Bank of India) follows similar guidelines with a photo size of 20 KB to 50 KB in JPG format and a signature size of 10 KB to 20 KB. The RBI Grade B examination also follows the same pattern, requiring JPG format photos between 20 KB and 50 KB.
For all banking exams, the photograph must have the candidate’s name and date at the bottom, a plain white or off-white background, and must not be taken with a mobile phone selfie (though in practice many candidates do this successfully with good lighting).
NTA Exams (JEE Main, NEET)
The National Testing Agency has standardized requirements across its major examinations. For JEE Main and NEET UG, the photograph must be in JPG or JPEG format with a file size between 10 KB and 200 KB. The dimensions must be at least 3.5 cm x 4.5 cm when printed, and the digital image should be at least 100 x 130 pixels.
The signature must be in JPG format between 4 KB and 30 KB. NTA specifically instructs candidates that photos taken against a colored background, wearing sunglasses, or with caps or hats (except for religious headwear) will be rejected. The face must be clearly visible, centered, and without shadows.
Driving License & Parivahan Portal
The Parivahan Sewa portal, which handles driving licenses, vehicle registration, and related services, accepts documents in JPG or PDF format. For new driving license applications and renewals, the photograph must be in JPG format with a maximum file size of 20 KB. The dimensions are typically 3.5 cm x 4.5 cm.
Supporting documents such as address proof, age proof, and existing license scans must be in PDF or JPG format with a maximum size of 500 KB per document. States may have slightly different limits depending on their own state transport portals, but the central Parivahan portal follows the above specifications.
Passport Photo Guidelines (India Specific)
Photo Size & Dimensions (2×2 inch, 51×51 mm)
Indian passport photos must conform to both domestic and international standards since Indian passports are internationally recognized travel documents. The correct size for an Indian passport photograph is 2 inches x 2 inches (51 mm x 51 mm). This is a square format, unlike the rectangular format used for most exam portal photos.
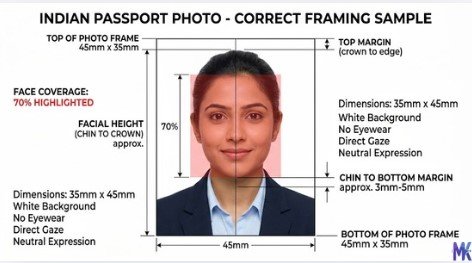
The face must occupy between 70 and 80 percent of the total frame, meaning the top of the head (including hair) to the chin should cover approximately 1 inch to 1.375 inches (25 mm to 35 mm) of the total photo height. The eyes must be between 1.125 inches and 1.375 inches from the bottom of the photo. When scanning for digital submission, the image should be at least 600 x 600 pixels to maintain print quality at 300 DPI.
Background, Face & Lighting Rules
The background must be plain white or off-white. No patterns, shadows, or colored backgrounds are permitted. The lighting must be even across the face with no harsh shadows on the face or background. Both ears should ideally be visible, meaning extreme side profiles are not acceptable.
The eyes must be open and clearly visible, looking directly into the camera. Glasses are permitted but should not have tinted lenses, and there must be no reflection or glare on the lenses. The expression must be neutral with the mouth closed. Hats and head coverings are not allowed unless worn for religious reasons, in which case the face from the forehead to the chin must remain fully exposed.
The photo must be in color, properly focused, and printed without pixelation or visible printing dots. Digital photos must be in JPG format and must not have any digital filters or alterations applied.
Common Passport Photo Mistakes
The most common reasons for passport photo rejection in India include a non-white background such as gray, blue, or cream walls which are commonly mistaken for white. Shadows behind the head or on the face due to improper lighting or incorrect positioning relative to the background are another frequent issue.
Photos that are too small, where the face does not fill 70 to 80 percent of the frame, are commonly rejected. Overexposed or underexposed photos where the face is too bright or too dark cause problems. Old photos that are more than six months old get flagged during verification. Photos with smiling expressions or open mouths are technically non-compliant. And photos taken on mobile phones with visible distortion or low resolution are also commonly rejected.
Signature & Document Upload Guidelines
Signature Size Requirements
For most Indian government exam and service portals, the signature must be made on white paper using a black or dark blue ink pen. The signature must then be scanned or photographed and uploaded. The signature should not be in block or capital letters it must be your natural, flowing signature.
The typical digital file requirements for a signature are JPG or JPEG format, file size between 5 KB and 30 KB (with 10 KB to 20 KB being the safest range), and pixel dimensions of approximately 140 x 60 pixels for most portals, though some accept up to 800 x 300 pixels. The background behind the signature must be pure white with no lines, boxes, or printed forms showing through.
Thumb Impression Rules
Certain government applications, particularly for police verification, voter ID enrollment, and rural welfare schemes, require a left or right thumb impression. The thumb impression must be taken using stamp pad ink blue or black on plain white paper, then scanned and uploaded.
The image should be in JPG format with a white background, file size typically under 50 KB, and the impression must be clear with visible ridges. Smudged, faint, or doubled impressions are rejected. Some portals that require thumb impressions may also request it to be uploaded alongside a photograph of the applicant for cross-verification purposes.
Document Scan Size Limits
When uploading supporting documents like marksheets, certificates, caste certificates, or income certificates, the scan must be clear and fully legible. The recommended scan resolution is 150 DPI to 300 DPI for documents containing text.
File size limits for document scans vary widely. For individual pages, most portals allow between 200 KB and 2 MB in PDF or JPG format. For multi-page documents, PDF format is preferred with a total size limit of 2 MB to 5 MB. Documents must not be password-protected. All four corners of the document must be visible in the scan, and there must be no cutoff of text or seals.
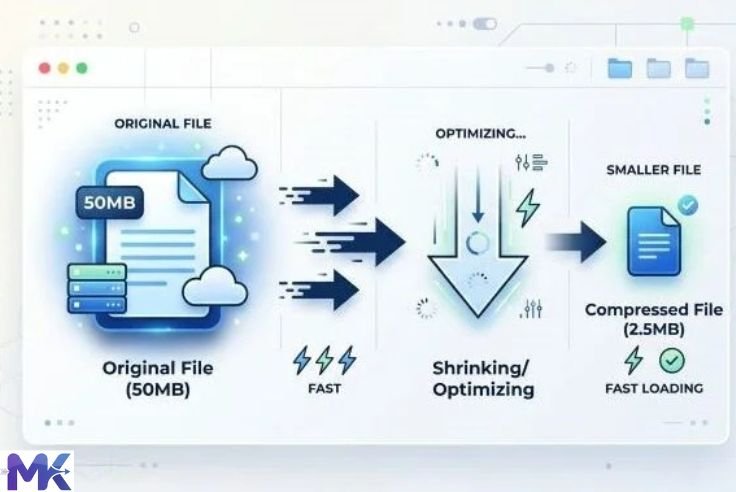
How to Reduce Image Size for Government Forms
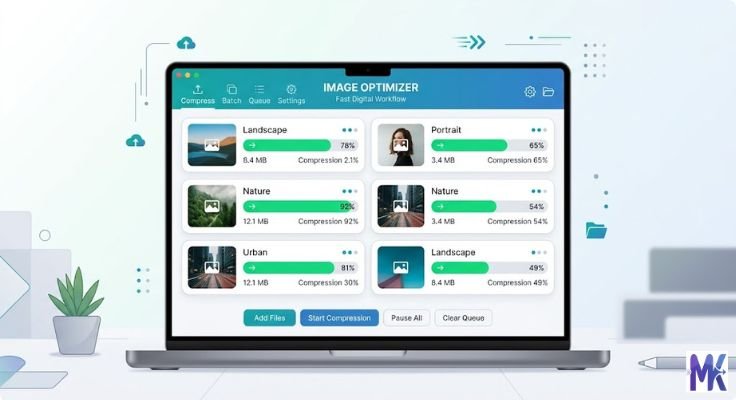
Online Image Compression Tool (Recommended)
If you want a fast and simple method, you can use an online tool like MB to KB Image Compressor.
This tool is specially designed for users who need to compress images for government forms quickly and accurately.
Key Features of mbtokb.site:
- Compress images in bulk (multiple files at once)
- Upload photos and signature images easily
- Set a fixed file size (like 20KB, 40KB, 100KB, etc.)
- Use custom size option for specific requirements
- Works directly in browser (no installation needed)
- Free and simple interface
How to Use:
- Open 👉 https://mbtokb.site
- Choose Image Compressor tool
- Upload your image(s)
- Select:
- Fixed size (e.g., 40KB), OR
- Enter custom size manually
- Click Compress
- Download your optimized images
- Check file size before uploading to the government portal
This tool is perfect when you need exact file size control, which is required in most government forms.

Mobile Methods (Android & iPhone)
On mobile, you can still use your browser and open MB to KB Image Compressor directly no app needed.
Alternative mobile methods:
- Use Gallery → Edit → Resize (available in many Android phones)
- Use apps like:
- Photo & Picture Resizer
- Image Size
Quick Trick:
- Send image to yourself on WhatsApp → it auto compresses (around 50–80KB)
Computer Methods (Windows & Mac)
If you prefer offline methods:
Windows:
- Use Microsoft Paint (Resize option)
- Or advanced tools like IrfanView
Mac:
- Use Preview → Adjust Size → Export as JPG with lower quality
👉 But for exact KB control, online tools like MB to KB Image Compressor are easier and faster.
Step-by-Step: Resize Image for Government Forms
Method 1: Using mbtokb.site (Fastest & Recommended)
Step 1: Open https://mbtokb.site
Step 2: Select Image Compressor tool
Step 3: Upload your photo or signature
Step 4: Choose:
- Fixed size (e.g., 40KB), OR
- Custom KB size

Step 5: Click Compress
Step 6: Download the file
Step 7: Check file size (Right-click → Properties)
Method 2: Using Mobile Gallery
Step 1: Open Gallery / Photos
Step 2: Tap Edit → Resize
Step 3: Adjust dimensions or percentage
Step 4: Save image
Step 5: Reduce quality if needed (70–80%)
Method 3: Using Computer Software
Windows (Paint):
- Open image in Paint
- Click Resize
- Enter pixel values
- Save as JPG
Mac (Preview):
- Tools → Adjust Size
- Enter dimensions
- Export → Reduce quality
Common Errors During Upload & Fixes
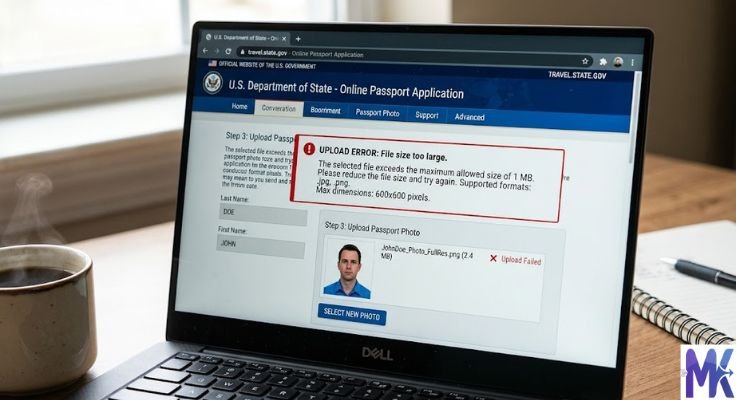
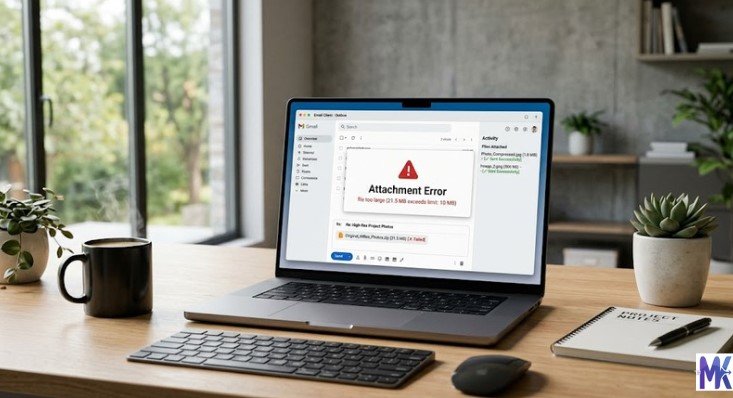
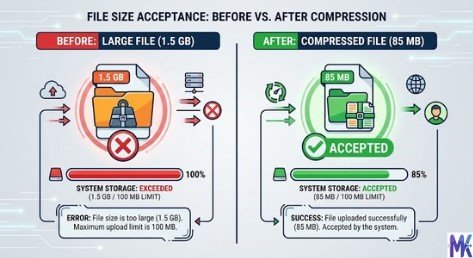
“File Size Too Large”
This is the most common error and means your image file exceeds the portal’s maximum KB or MB limit.
The best solution is to compress the image using a reliable tool like MB to KB Image Compressor.
With this tool, you can:
- Set an exact file size (e.g., 35KB, 40KB, 50KB)
- Use bulk compression for multiple images
- Upload both photos and signatures
- Choose fixed size or custom KB option
Always aim for a file size that is 20–30% below the limit.
For example:
- If the limit is 50KB, compress your image to around 35KB
This ensures your file uploads without errors.
Important Tip:
Do not just rename the file (like changing .png to .jpg). Government portals check the actual file size and data, not the file name.
“Invalid Format”
This error means you have uploaded a file type that the portal does not accept. Common causes include uploading a PNG when only JPG is accepted, uploading a PDF as a photo, or uploading a HEIC file (the default format on newer iPhones). The fix is to convert your image to JPG. On a computer, open the image in Preview or Paint and save or export it as JPG. On mobile, use an app like Image Converter or simply take a screenshot of the image and save it as JPG. Make sure the file extension is .jpg or .jpeg.
“Incorrect Dimensions”
This error means the pixel width or height of your image does not match the required dimensions. Check the portal’s exact requirements for example, 200 x 230 pixels — and use a resize tool to set the image to exactly those dimensions. When using online tools, look for a “Custom Size” option and enter the exact pixel values. Do not rely on percentage scaling as it may not produce the exact required dimensions. After resizing, use a tool like Windows Properties or Mac Get Info to verify the pixel dimensions before uploading.
“Blurry Image Rejected”
Blurry image rejection typically happens for two reasons. Either the original photograph was taken in poor lighting or out of focus, or the image was compressed so aggressively that quality was lost. If the original photo is blurry, you need to retake it there is no software fix for a genuinely out-of-focus photo. If the blurring happened during compression, reduce the compression strength and aim for a higher quality setting (80 to 90 percent quality in most tools) even if the file size is slightly larger. Always check if the portal allows a higher KB limit than you assumed, as many users compress unnecessarily to very low values.
Best Practices for Image Optimization
Maintain Quality While Compressing
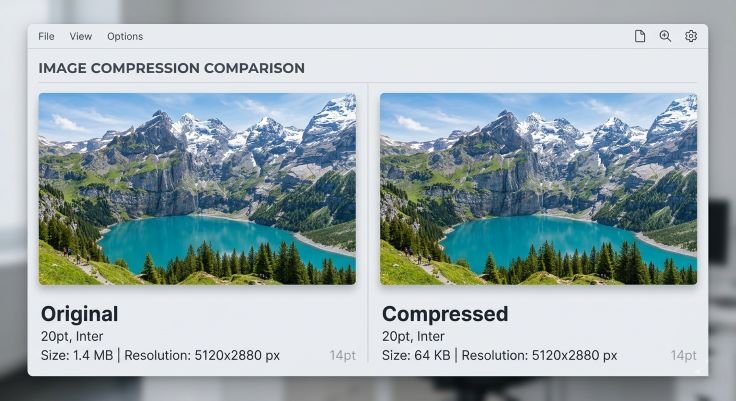
The key to successful image optimization for government forms is reducing file size without visibly degrading image quality. Always start with the highest-quality source image available ideally a photo taken with a decent camera under proper lighting against a white background. Never repeatedly compress the same image, as each compression cycle degrades quality further.
When using compression tools, set the output quality to 75 to 85 percent for JPG files. This range typically reduces file size by 50 to 70 percent compared to a 100 percent quality JPG while maintaining sufficient clarity for government document purposes. Always preview the compressed image before downloading to confirm the face, text, and details are still clearly visible.
Ideal Compression Levels
For passport-sized photos, aim for a file size of 30 KB to 50 KB at a quality setting of 75 to 85 percent. This works for the majority of Indian government portals. For signature images, a file size of 10 KB to 20 KB at quality setting 80 percent is ideal. For document scans, stay between 150 KB and 500 KB at 150 DPI, using PDF format where possible to balance quality and file size.
Avoid going below quality level 60 percent for photos that include a human face, as skin tones and fine details become noticeably degraded, which can cause biometric or human verification failures.
Choosing JPG vs PNG
JPG is the correct choice for photographs in almost all cases when dealing with Indian government portals. JPG uses lossy compression that is excellent for photos with natural gradients, skin tones, and backgrounds. It produces smaller file sizes that are easier to keep within portal limits.
PNG should only be used when the portal explicitly asks for it, or when you are uploading a signature with a pure white background and need the sharpness of lossless compression. PNG files are larger than JPG files for the same image, so using PNG for a portrait photograph often results in a file that exceeds the portal’s file size limit. PNG is lossless, meaning quality is perfectly preserved, but the larger size is a practical disadvantage for most government upload scenarios.
Pixel, DPI & Size Conversion Guide
What is DPI?
DPI stands for Dots Per Inch and is a measure of image resolution. It tells you how many individual dots or pixels are packed into one inch of the printed or displayed image. A higher DPI means more detail and sharpness, while a lower DPI means a more pixelated or blurry appearance when printed.
For on-screen display (such as uploading to a website), DPI does not directly affect the appearance only the pixel dimensions matter. DPI becomes important when you print the image, as it determines how large and sharp the printed output will be. For government documents that may be printed or stored as physical records, 200 DPI to 300 DPI is the recommended standard.

Convert Inches to Pixels (Examples)
To convert inches to pixels, multiply the size in inches by the DPI value. For example, a 2 x 2 inch photo at 100 DPI equals 200 x 200 pixels. The same 2 x 2 inch photo at 200 DPI equals 400 x 400 pixels, and at 300 DPI it becomes 600 x 600 pixels.
For a standard 1.38 x 1.77 inch (35mm x 45mm) photo at 100 DPI, the pixel dimensions are 138 x 177 pixels. At 200 DPI it becomes 276 x 354 pixels, and at 300 DPI it becomes 413 x 531 pixels.
Common Size Conversions Used in India
35mm x 45mm (standard exam photo) equals 138 x 177 pixels at 100 DPI or 413 x 531 pixels at 300 DPI. 51mm x 51mm (passport photo) equals 200 x 200 pixels at 100 DPI or 600 x 600 pixels at 300 DPI. 3.5cm x 4.5cm (driving license / Parivahan) equals 138 x 177 pixels at 100 DPI. Signature panel 14cm x 6cm equals 551 x 236 pixels at 100 DPI.
For most online applications, using 100 DPI to 150 DPI is sufficient. If the portal specifies 300 DPI, use the corresponding higher pixel dimensions.
Free Online Tool (Recommended)
For quick and accurate image compression, you can use MB to KB Image Compressor.
This is a complete image tool that allows you to:
- Compress images to an exact KB size
- Resize images with custom dimensions
- Upload and process multiple images (bulk)
- Convert and optimize images directly in your browser
Unlike many other tools, it gives you full control over file size, which is very important for government form uploads.
You can:
- Set fixed sizes like 20KB, 40KB, 50KB
- Or enter a custom size manually
For most users, this tool is enough and removes the need to use multiple websites.
Offline Software Options
If you prefer not to upload images online, you can use offline tools:
- IrfanView – Best for batch resizing and compression on Windows
- GIMP – Advanced editing with full control over image settings
- Microsoft Paint – Simple and built-in for basic resizing
- Apple Preview – Easy resizing and export options on Mac
For mobile users:
- Adobe Lightroom Mobile
- Snapseed
- Photo & Picture Resizer (simple and easy)
- However, offline tools require more manual work compared to MB to KB Image Compressor.
Privacy & Security Tips
When compressing images for government forms (photo, signature, ID proof), keep these points in mind:
- Use trusted tools only, such as MB to KB Image Compressor
- This is a browser-based tool, which means your image is processed directly in your browser.
- Your file does not get uploaded or stored on any server, making it a safer option for personal photos and documents.
- Avoid uploading sensitive documents (CNIC, passport, etc.) on unknown websites
- Prefer tools that do not store your images permanently
- For highly sensitive files, use offline software like GIMP or IrfanView
- Clear your browser history after uploading important images
- Avoid websites that force account creation for simple compression
Frequently Asked Questions (FAQs)
For most Indian competitive exams including SSC, IBPS, and NTA exams, the standard photo size is 200 x 230 pixels in JPG format with a file size between 20 KB and 50 KB.
Most government portals in India prefer or require JPG format. PNG is accepted on some portals but tends to produce larger file sizes. Always check the specific portal’s instructions and convert to JPG if in doubt.
For online uploads, 100 DPI to 200 DPI is typically sufficient. For print submissions or portals that specify DPI, use 300 DPI. Check individual portal guidelines as requirements vary.
Technically, most portals require properly taken photographs with plain white backgrounds, not selfies. However, if taken against a white wall under good, even lighting, a mobile photo often passes. For passport applications specifically, the quality requirements are stricter, and a professionally taken photo is recommended.
Use an online compression tool like mbtokb.site. Set a target file size that is comfortably below the portal’s limit and download the compressed version before uploading.
On Windows, right-click the file and click Properties, then Details tab. On Mac, right-click and choose Get Info. Both will show file size in KB and pixel dimensions.
Yes, as long as the photo was taken recently (within six months), meets the background and face requirements, and you resize and reformat it to meet each portal’s specific size requirements.
Common reasons include the background not being truly white (check using photo editing software), the face being too small in the frame, the image being slightly blurry, or the JPG compression being too aggressive. Also double-check that the file extension is .jpg and not .png or .jpeg with wrong encoding.

Conclusion
Uploading the correct image size on Indian government websites is not a complicated task once you understand the requirements. The key is knowing that different portals have different rules, and you must always check the specific instructions for the portal you are applying on rather than assuming a one-size-fits-all approach.
To summarize the most important points: use JPG format for photographs and signatures in virtually all cases. Keep photo file sizes between 20 KB and 50 KB and signatures between 10 KB and 20 KB for the broadest compatibility. Use standard dimensions of 200 x 230 pixels for exam photos and 200 x 200 pixels (or 600 x 600 at 300 DPI) for passport photos.
Always start with a high-quality source image taken against a white background in good lighting, and compress it afterward rather than trying to fix a low-quality photo. Use trusted free tools like MB to KB Image Compressor or offline tools like IrfanView to resize and compress images without losing necessary clarity.
As Indian government services continue expanding digitally in 2026, familiarity with image upload requirements will save you time, prevent application delays, and ensure your documents are processed smoothly the first time.